
It turns out there’s more to laser alignment than I thought, and more than is revealed in the written instructions or in the alignment procedure video.
 The basic alignment involves adjusting the three mirrors, shown here as M1, M2, and M3. The gantry carries M2 and M3 forward and backward along the Y axis of the machine. M3 travels left and right with the head, along the gantry in the X axis of the machine, and reflects the beam down onto the work. The infrared cutting beam comes out of the laser tube, passes unchanged through the beam combiner (BC), and bounces off M1, M2, and M3. The red laser is reflected by the beam combiner, and travels with the cutting beam as it bounces off the mirrors.
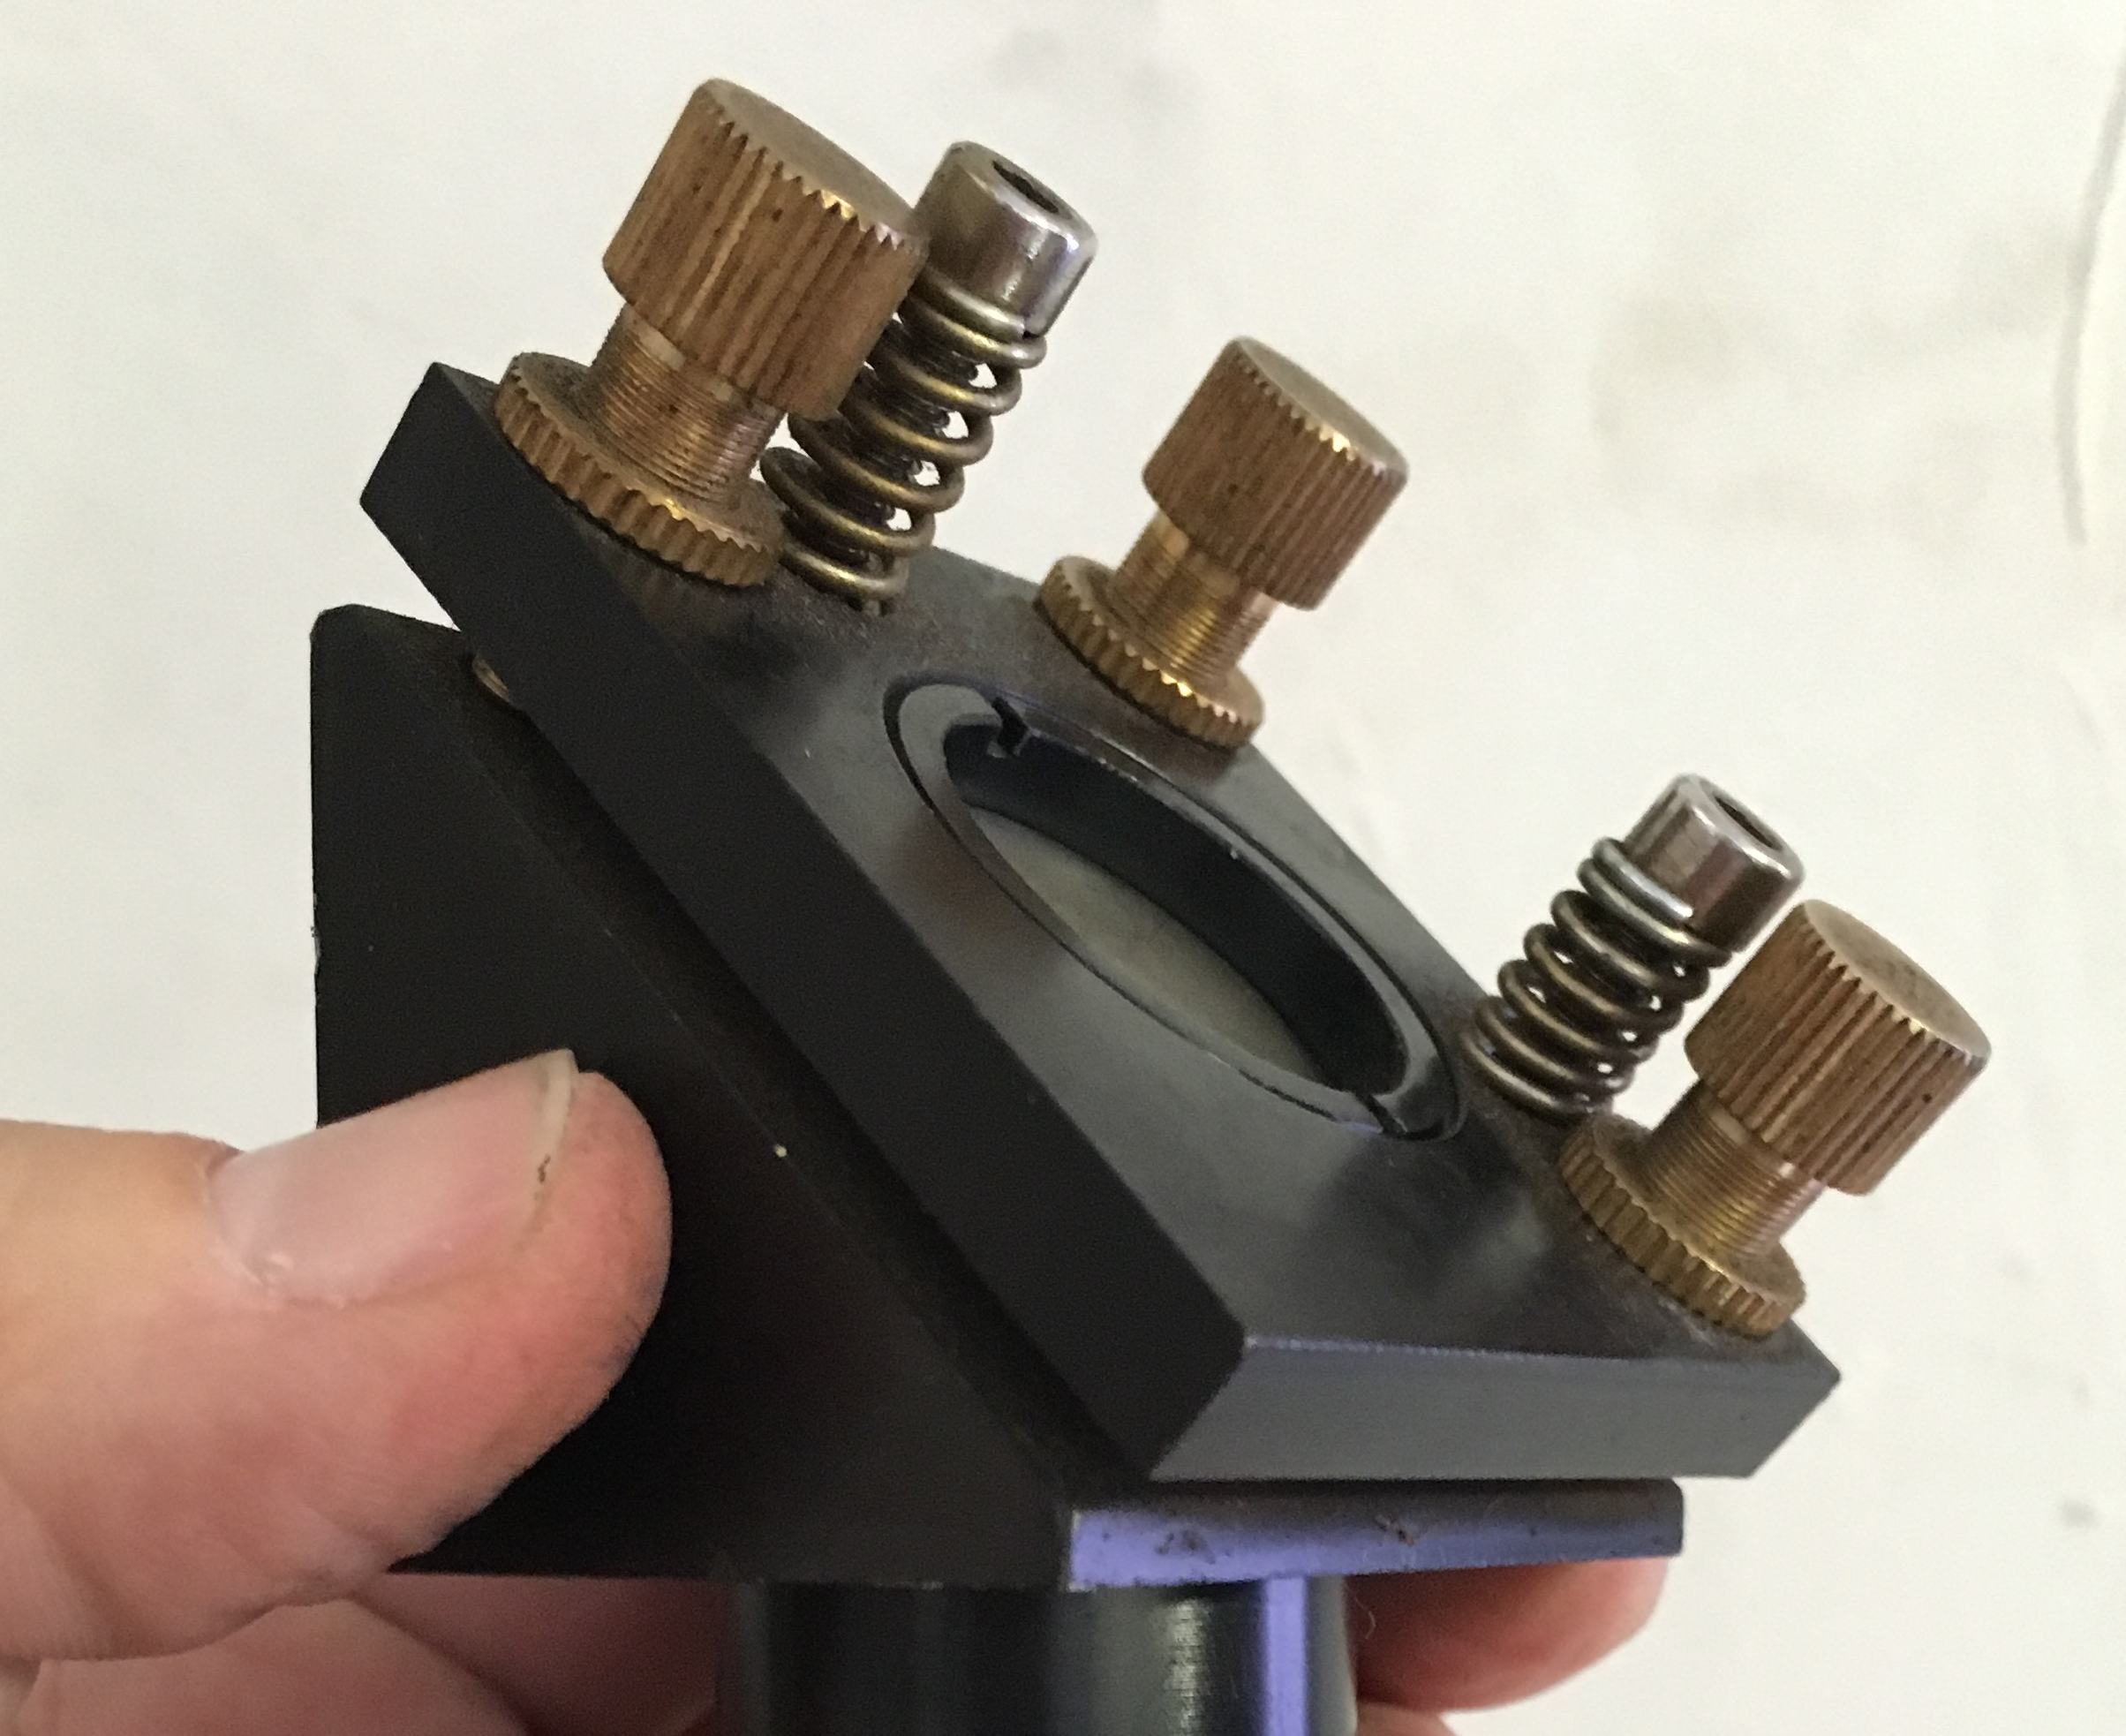 Each mirror floats in a mount like the one shown here. The three thumbscrews, pushing against the tension springs, define the position and orientation of the mirror carrier on its mount. By turning one or two of the thumbscrews, you can tilt the mirror over a pretty wide range. By turning all three, you can move the mirror a little, without changing its angle.
In the basic alignment, the first goal is to arrange for the beam to leave M3 at the same place and at the same angle, regardless of the position of the gantry (that is, the Y axis) or the position of the head on the gantry (the X axis). The only way this can work is if the beam between M1 and M2 is exactly parallel to the Y axis, and the beam between M2 and M3 is exactly parallel to the X axis. Luckily, these two constraints don’t interact. We first measure where the beam hits M2, and adjust the angle of M1 so that it doesn’t move when the gantry moves. Once that’s perfect, we measure where the beam hits M3, and adjust the angle of M2 so that it doesn’t move when the head moves on the gantry.
Now that we have the beam hitting M3 consistently, the final step of the basic alignment is to adjust M3. We want the beam reflected from M3 to be vertical and centered on the lens. The lens is buried inside the head, so it’s not easy to measure where on the lens the beam is striking. If we pull the lens tube out of the head, we can measure where the beam falls on the table without the lens. Now we have the same type of adjustment to make as before: we adjust M3 so that the beam hits the table in the same place, regardless of the Z-axis height of the table. That guarantees us a consistent vertical beam.
That’s great. We have a nice vertical beam that doesn’t move around when the mechanical axes move, so we can cut or engrave consistently anywhere on the work. But we haven’t yet arranged for the beam to hit the center of the lens. If that nice vertical beam hits the lens off-center, it will come out of the lens at an angle. The beam has to pass through a relatively small nozzle at the bottom of the head, and that nozzle can’t be moved from the central axis of the head. If the beam is at any significant angle from vertical, it won’t go through the nozzle cleanly. Not good!
So what controls where the beam strikes the lens? It can’t be the tilt of any of the mirrors, because those angles are already fully constrained by the alignment we just completed. M1 has to be set to make the M1-M2 beam parallel with Y, M2 has to be set to make the M2-M3 beam parallel with X, and M3 has to be set to make the M3-Lens beam vertical. What’s left? We need to find two degrees of freedom somewhere, to adjust the beam position at the lens to the center, without disrupting the beam angles. These adjustments are not covered in the basic alignment procedure.
The beam position can be adjusted along the Y axis by shifting the position of M2. This is done by loosening the mounting bolts at the base of the M2 mounting pillar and sliding the whole pillar forward or backward. This is possible because the mounting holes are slotted.
The other axis we need to adjust is the Z axis, or height of the XY plane the beam travels in from the laser tube to M3. The only way to adjust this height is to change the physical height of the laser tube itself. The tube is mounted on two stanchions, each of which telescopes with a sliding dovetail arrangement. We must loosen the set screws on the dovetail, slide the upper part of the stanchion to a new height, and retighten the set screws.
When we’re adjusting the beam position, how do we measure it? Ideally we’d be looking at where the beam falls on the lens itself, but that’s hard, because the lens is inaccessible inside its mounting tube. I’ve come up with two procedures that can be used as a substitute. The easier procedure is to simply measure where the beam enters the head on the way in to M3. There’s a nice circular opening in a vertical plane machined into the head. If the head is designed in the obvious way you’d expect, the beam should pass through the center of that opening. As far as I can tell, this is good enough.
An alternative procedure is to remove the lens and try to measure the beam position as it exits the head, after it would have passed through the lens. One way to do that is to place a thick object on the table and raise the table so the top of the object just touches the bottom of the nozzle. Trace around the nozzle onto the object, then remove the lens tube. Then we just need to center the beam inside the traced circle.
This all assumes that the lens is symmetrical and that it is mounted horizontally, perfectly perpendicular to the Z axis travel of the table. We’re probably safe to assume that the lens is ground symmetrically, but the little silicone (?) gasket between the lens and its holder adds some uncertainty in its exact orientation. One test we can easily do is loosen the nut that holds the lens tube in place, just enough so it is free to turn about the optical axis. As we spin the lens tube, ideally the beam should not move. In practice, it does move a little bit. As long as the beam stays close enough to center to pass cleanly through the nozzle, it should work fine.
Another check is to repeat the check where we move the Z axis (table height) up and down and watch for the spot on the table to move, this time with the lens in place. If the spot doesn’t move with or without the lens, we know it’s passing through the exact center of the lens. Again, in practice it’s enough if the beam passes cleanly through the nozzle.
So, a proper optical alignment goes beyond adjusting the nice golden thumbscrews on the three mirrors. The other two adjustments must be used to center the beam on the lens and make it vertical.
What can happen if we don’t understand this? The temptation is strong to just twiddle the thumbscrews on M3 until the beam comes out of the nozzle. That works, to some extent. The beam may be off center on the lens, but we can compensate by tilting the beam above the lens so that the beam below the lens does pass through the nozzle. The resulting beam will strike the work at an angle. This won’t make much difference for engraving, but when we cut thicker material we will start to notice that the cut edges are at an angle. This is easy to miss at first, because the hourglass shape of the beam as it comes into and goes out of focus already cuts at a slight angle, unavoidably. As the machine drifts out of alignment, and compensating adjustments are made at M3, the angle gets worse, until the beam reaches the edge of the lens. At that point it starts to burn the rubber gasket, which damages the lens and generates a plume of debris that contaminates M3. Which is exactly what happened on our laser in August. I finally got this all figured out and the laser properly aligned on August 20.