Maximum Material Width < 48"

I thought I could fit a 48-inch wide piece of material onto the laser’s knife table (removing the honeycomb table that usually sits on top of it). After all, it’s supposed to be a 48×36-inch laser, right?

Actually, no. If you lower the Z axis a bit, the 48″ material can be fit in between the walls of the chamber. But when you raise the Z axis to focus on the material, it hangs up on the lip surrounding the table. This makes a horrifying noise, and very likely screws up the leveling alignment of the table, and could damage the Z axis mechanism.

Try to avoid doing that!

The laser is more accurately described as a 1200x900mm machine. That works out to 47.24″ x 35.43″. And in reality, the X/Y positioning system can’t even quite cover that entire area. It can really do 47.24″ wide, but the Y positioner only spans 35.19″.

And if you have the honeycomb mesh on the table, which you usually will, your material has to stay inside the frame that holds the honeycomb. Those dimensions are 45.875″x34″.

All numbers above are approximate. Leave plenty of margin if you can.

Vector Lines Cutting Twice

I caught the laser tracing over each vector twice. That takes twice as long, and adds extra charring and/or lost material.

You can see the double cutting without actually running the laser by changing the mode to Simulate Vector and then hitting Go. Watch the red dot and see if it’s doing the wrong thing, as it was for me.

What’s going on here? The problem, in my case anyway, was easily fixed once I figured it out. The object was set to have an Outline property of 0.5 points. That’s a skinny line, but it has a width. When CorelDraw prints a line like that to the laser, it encodes it twice, once for each edge of the line. This is very nearly invisible and undetectable on the Vector tab of Retina Engrave 3D, unless you run the simulation. The solution is to set the Outline property to Hairline. That makes each line have zero width, and so it only gets one pass of the laser. That’s probably what you want.

Getting Raster Data out of Vector Drawings

Today I struggled to get raster data out of CorelDraw and into the laser software, Retina Engrave 3D. It’s supposed to work, but I was consistently getting a blank screen on the Raster Engrave tab.

I hope there’s a better way, but here’s what worked for me: I exported the drawing to PDF, opened the PDF file with Adobe Reader, and printed to the Full Spectrum Engineering Driver from Adobe Reader.

In my case, the data I wanted to raster was actually text in a strange font. For the PDF trick to work for text, I had to install the font on the Colaser computer. I might have been able to work around that by converting the text to curves in CorelDraw, but once I found a combination that worked I was anxious to actually make some parts.

I also figured out that if you hit the J key to run a box on the laser, the software will forget that you had it set to Raster then Vector mode. If you set Raster then Vector mode and immediately hit G (or the play button on screen) then it really does raster then vector, as advertised.

Kerf size for finger joints

Finger joints, such as the ones used by the web-based box designer at http://boxmaker.rahulbotics.com, depend on accurate dimensions to provide a tight fit. If you take the standard settings, it assumes that the parts are cut out with no loss of material. Since there is always some loss, that creates a box that fits together, but loosely.

To get a tight fit, you need to click on Advanced Options and enter the real kerf width where it says Cut Width.

I ran some tests with quarter-inch acrylic (pretty typical for boxes) and found that a Cut Width of 0.005″ is about right for our laser today. That’s right in the middle of what the web page says are typical values. You can probably get away with just using 0.005 for your project. Of course, if you need the best fit, you’ll have to run your own tests on your material on the day you’re cutting it.

You’ll also want to use an accurate setting for Material Thickness. It turns out that quarter-inch acrylic is nominally 0.22″, and half-inch is 0.472″, and both of those numbers vary a bit. For perfect results, use a micrometer on your material.

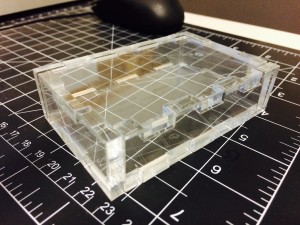
Laser cut box made out of quarter-inch acrylic using a design generated by http://boxmaker.rahulbotics.com

Laser cut box made out of quarter-inch acrylic using a design generated by http://boxmaker.rahulbotics.com

Rotary Adapter Arrived

We now have the rotary adapter for the laser at Colab. This enables us to engrave on cylindrical objects, including tapered cylinders such as beer glasses.

I’ll update here when I’ve tested it out. If you have an urgent job that needs the rotary adapter, let me know and we’ll try it out together.

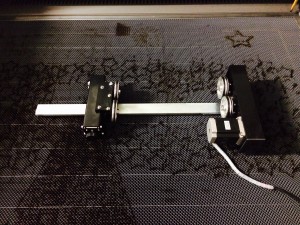
Rotary adapter for engraving cylindrical objects on the laser.

Rotary adapter for engraving cylindrical objects on the laser.

CorelDraw X7 Installed

We now have CorelDraw Graphics Suite X7 installed on the Colaser computer. It’s a very full-featured vector drawing program, and it also comes with Photo-Paint (a bitmap editing program), PowerTrace (for converting bitmaps to vector), and a bunch of other stuff.

If you’re still trying to decide what vector drawing package to learn, CorelDraw is a reasonable choice. You can get the Home & Student edition for about $130. We have the full version at Colab, since it supports more import file formats you might want to use, but for original drawings the Home & Student version is probably fine.

Laser Scheduling

Now that we have some people trained and checked out on the laser, we need a scheduling mechanism to reserve time on the laser. Eventually this should be automated and easy, but for now Meg <meggieking@gmail.com> has agreed to handle the scheduling manually. Please contact Meg to arrange time on the laser.

Between now and YouTopia, priority will be given to people working on the Temple and art projects for YouTopia. If you have other projects, let Meg know and she will still try to find a timeslot for you.

Laser Classes

Training classes to use the laser will be held at Colab on Sunday, September 14 beginning at noon, and again on Thursday, September 18 at 7pm. These two sessions may already be full; if you need to laser something before YouTopia contact Meg to see if you can get on the schedule. More classes will be scheduled as needed.

Expect to spend about 90 minutes in the classroom, followed by hands-on time in the laser loft.