About Paul Williamson

Paul is the lead operator of the Colab laser.

Laser Fixed!

Replacing the two thermistor surge suppressors in the high voltage power supply seems to have cured the laser of its problems. Hurray! It’s actually cutting a bit better than it has been doing recently.

Total parts cost: $6.66, plus shipping. Not bad!

Laser classes on April 3 and April 10 will go ahead as scheduled. A new class or two will be scheduled soon, with people from the canceled March 26 class having first shot.

Debug Update

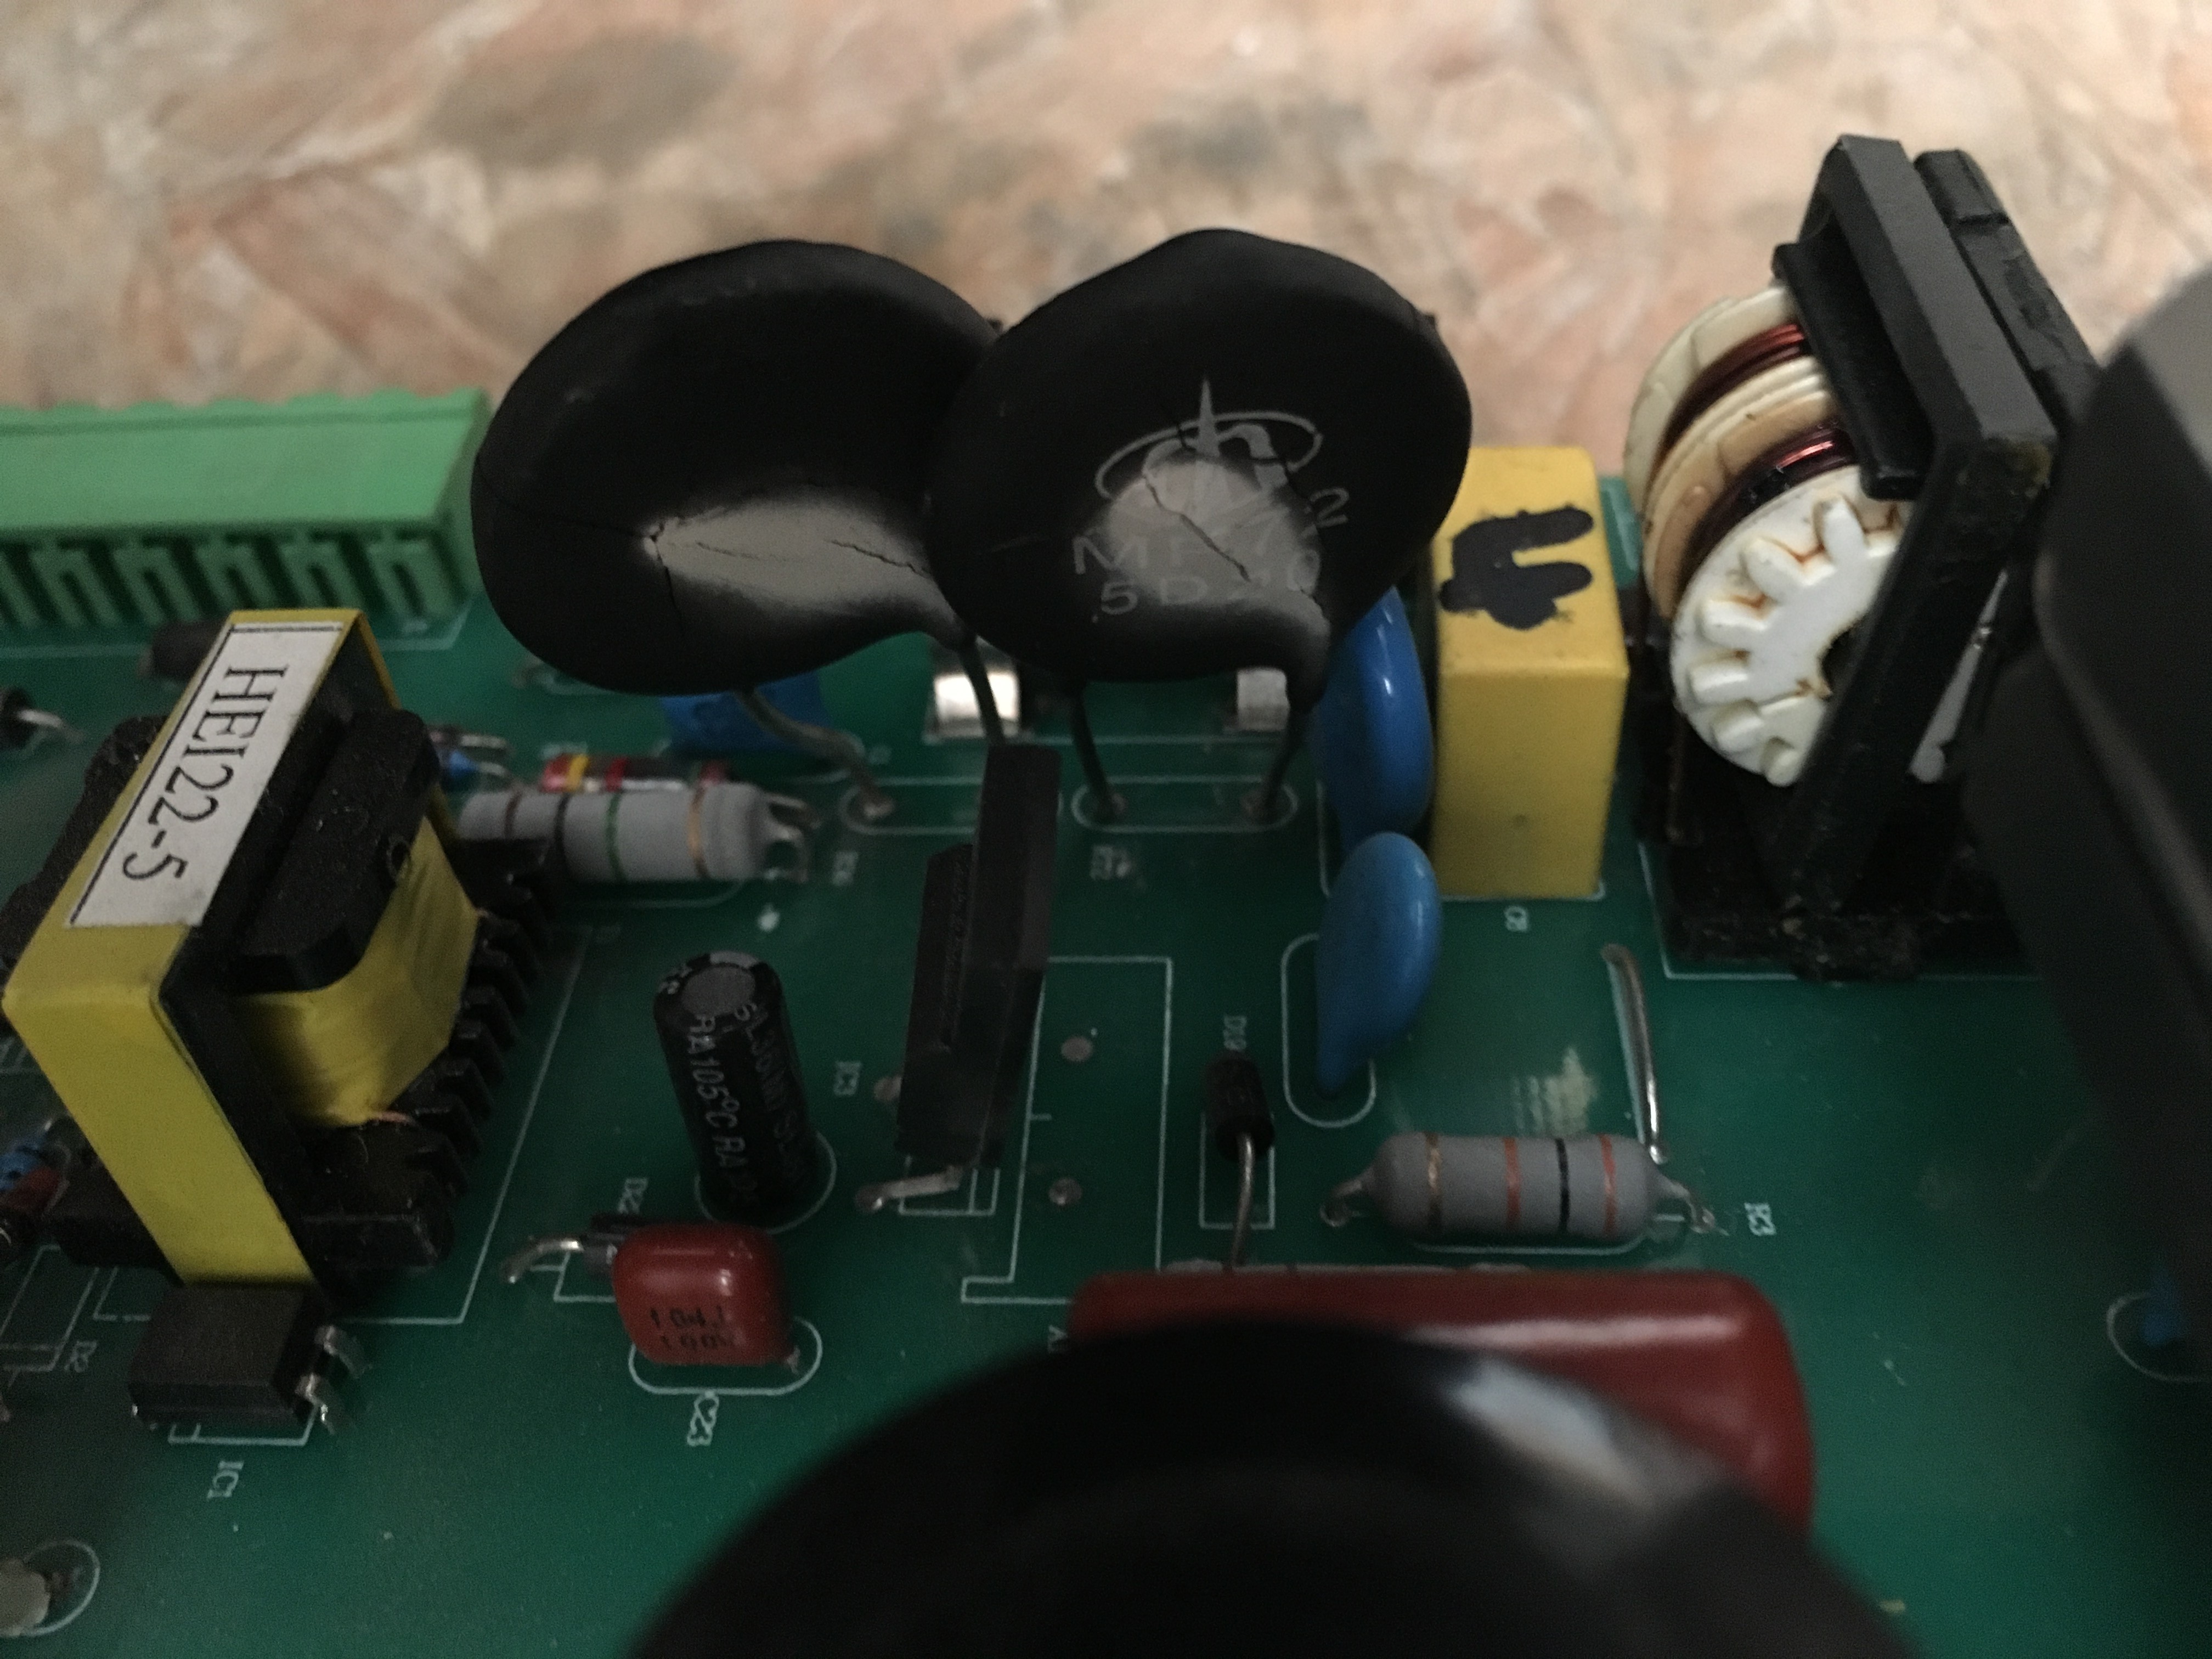
After a couple of rounds of back and forth with tech support, they had me open up the high voltage power supply and inspect for visible damage. Somewhat to my surprise, I found some. These two big black ceramic disks are clearly blown up. By the part number MF72-5D20 these are power NTC thermistors used as surge protection. According to tech support, this type of failure is usually caused by a random power surge.

I have replacement parts on order (they’re cheap) and will try simply swapping out the thermistors as soon as they come in. If that doesn’t solve the problem I will probably have to send the power supply in for repair ($100 plus shipping and handling). Cost-wise, this could have been a lot worse.

IMG_5203 IMG_5195

Laser Not Working

The laser is currently not working at all. The laser tube just won’t fire. I strongly suspect a failed high voltage power supply. I have a support ticket open with Full Spectrum Laser and expect to hear back by Monday. If I’m right about the problem, the downtime will depend on whether they have a replacement power supply in stock.

The laser class for Saturday, March 26 (later today) is CANCELED. We can’t have a laser class without a working laser. The classes for April 3 and April 10 are still on, for the time being, but are at risk of being canceled if I’m not able to get the laser repaired in time.


Classes Scheduled

Three new sessions of the basic operation and safety training course have been scheduled:

Saturday, March 26, 1pm to 5pm

OR

Sunday, April 3, 1 pm to 5pm [THIS SESSION IS NOW FULL]

OR

Sunday, April 10, 1 pm to 5pm

If you’d like to sign up for one of these classes, please email class@colaser.org and let me know which session you’d prefer. The laser room is small, so class size is limited.
The class is free, and once you’ve completed the class you’ll be able to schedule time to use the Colaser, which is also free for art and personal projects. You don’t need to bring anything special to class. Be prepared for about 90 minutes of classroom instruction, followed by hands-on exercises with the laser.

Engraving a Mirror

I’ve been wanting to try engraving a glass mirror. I picked up several 2-inch round mirrors from the craft store for a test.

You could engrave from the front, which would be the same as engraving any kind of glass. You’d get a frosted effect. But what I wanted to try was engraving the back, through the metallized coating that turns a sheet of glass into a mirror.

For my first attempt I guessed 10 power and 100 speed, and that turns out not to be enough. It cut through the protective coating, and into the metal layer, but not through the metal. Interestingly, the metal layer appears to be copper colored from the back. I’m guessing that the white metal (do they still use silver?) reflective layer is very, very thin and copper is plated on top of it for protection.

IMG_4883

Increasing the power to 30 created the effect I was looking for. It was immediately obvious that it was cutting through the metal, because the laser lit up the entire piece!

In the video you can see that I used some masking tape folded over to attach the mirror to a piece of scrap wood. Without the tape, the compressed air blast from the laser head was enough to float the mirror out of alignment. I engraved a circle on the wood to help me place the mirror accurately.

The final result is a little hard to visualize from a photograph, but it looks really cool in person. Sparkly! In the photo you can see the reflection of my rose gold iPhone (camera) in the parts of the mirror that are still mirror. The engraved parts appear frosted white.

IMG_4884

Here’s what it looks like from the back:

IMG_4887

The dark blue is the protective coating, which you can see has been removed in many places where the metal is left intact. It would probably be a good idea to re-coat the engraved mirror to keep the metal from corroding. Also, the edges are sharp, so some kind of mounting for it (or grinding the edges smooth) would be a good idea.

Trying to Match Epilog

There were many fascinating things shown at San Diego MakerFaire recently. One of them was an Epilog laser cutter. Epilog is a U.S. brand that commands a significantly higher price than the Full Spectrum Laser we have, which is based on an imported Chinese product. Epilog lasers are known for doing very fine engraving. At MakerFaire, they were cutting and engraving a demonstration file, and handing them out, so I grabbed one. It was a detailed raster-engraved Aztec calendar about 2.1 inches in diameter, on 1/8-inch prefinished alder wood from LaserBits. I ordered the same wood (I think), found the same file online (minus the text), and tried to reproduce it on the Colaser.

Once I got the settings close, my results were actually pretty close to the Epilog sample.

IMG_4881

I’m not sure why the engraved parts are darker on my version than on Epilog’s. Mine also needed wiping off after engraving, whereas the Epilog sample came out of the machine pretty clean. Comparing the detail closely, you can see that the Epilog held the finest detail a little better.  It’s possible I could do better by more fiddling with settings. Maybe reducing both power and speed would work better.

This kind of detail is only possible with high quality wood. This 1/8″ alder is about $10 a square foot, if you order it in 6×12-inch sheets from LaserBits. It’s much nicer to work with than any of the plywoods I’ve tried.

Here are all my attempts.

IMG_4879

The bottom one was under powered, and the two in the middle row were done at too high a power setting: the laser engraved right through the wood. I found that the raster power setting was quite non-linear, which is why it took so many tries. The setting I liked the best was 33 power, 100 speed.

Engraving a highly detailed design all the way through makes a really cool filigree effect.

IMG_4877

This design would be too fragile, but with some attention in the design to including a support structure, this would be sturdy enough for some purposes.

Please no campfires

If your job looks like this, either you’re trying to cut some thick material that’s beyond the capability of our laser, or else you have chosen your settings poorly. This kind of burning generates a lot of smoke and flying embers, which can contaminate the optics and lead to expensive repairs. If you see this kind of result, please STOP right away and rethink your job.

IMG_4858

Bugs Can Be Anywhere

During class last night, we ran into a problem where parts of the user interface in Retina Engrave 3D were being disabled. The controls for setting raster power, for instance, were grayed out, and some (but not all!) of the menus at the top of the screen were also unresponsive.

It’s not too unusual for the laser software to get confused and need to be closed and restarted. That didn’t help. We tried closing and restarting CorelDraw, too, without success. We tried closing and restarting both at the same time. We even tried rebooting the computer. Nothing seemed to help.

Then Laura suggested power cycling the laser itself. That worked! We were all surprised, since it isn’t at all obvious that the laser software even talks to the laser before starting the job (beyond the connection monitor in the lower left corner, that is), but apparently it does.

So, when things go off the rails in a bizarre way, don’t forget to try power cycling the laser.