Engraving Steel

I’ve been saying that the laser can’t engrave metals, with the possible exception of light engraving on stainless steel. Well, after class this afternoon we decided to try it. Turns out, the laser really can engrave stainless steel, for at least this one (unknown) type of stainless. It cuts a nice little divot out of the steel. The skull logo is about one inch across:

IMG_4355

Emboldened by this result, we also tried engraving one of the steel weights. These are standard cold-rolled steel, not stainless. They aren’t rusting because I sprayed them with clear spray paint. The laser successfully marked the surface of the steel, but didn’t penetrate to any significant depth. (Or maybe it just burned the clear spray paint. I didn’t have any unpainted steel handy.) The text is about two inches across.

IMG_4356

Both of these were vector jobs cut at 100% current, 100% power, and 10% speed. The speed could be lowered even more to get a deeper cut. Even these big thick chunks of metal were noticeably warm after the job.

On both jobs, you can clearly see the spot where the laser started to cut each vector. There’s less discoloration and a bit more depth in that spot. The rest of the cut is pretty consistent, but somewhat rough. You’d have to test your specific material and decide if you like the effect.


Raster and Vector Rendering

After completing the recent blog post about Combining Raster and Vector data, my next step was to add the same information to the Keynote presentation I use when teaching the basic operation and safety class. In doing so, I came up with a way to show how RetinaEngrave3D renders raster and vector data for different kinds of input.

Start by examining this screen capture from CorelDraw of our test subjects.

original

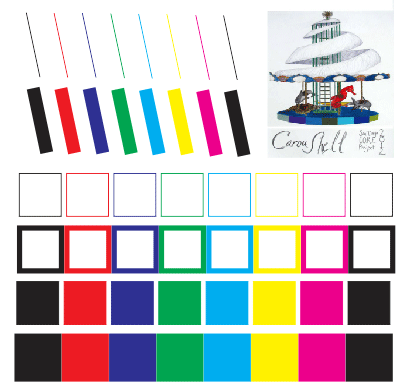
In the upper left, we have eight lines drawn with the width set to “hairline”, which is CorelDraw’s way of saying that the lines have no width, they’re just lines. The lines are in all the primary colors recognized by RE3D: black, red, blue, green, cyan, yellow, and magenta, plus another black one. Below that, we have the same eight lines with the width set to 10 points. Below that we have four rows of colored squares. The first row is “hairline”, the second row has a few points of width. The third and fourth rows are the same as the first and second, but with a fill color as well as an outline color. Finally, in the upper right corner we have a bitmap image (a color scan of the original concept drawing for the Caroushell C.O.R.E. 2012 project).

Now, suppose we “print” this to RetinaEngrave3D. The laser software interprets the data it gets from the drawing software twice, once for raster and once for vector.

Vector Rendering

Here’s the result on the Vector Cut tab:

vector

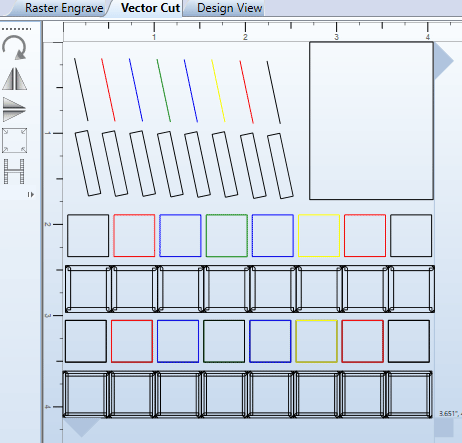
As you can see, RE3D has preserved the colors on all the “hairline” vectors, but every vector that has a width has been slammed to black. What’s more, only the “hairline” lines are still the vectors as we drew them. All the wide lines have been rendered as outlines of the area they cover. If you look closely at the squares drawn with wide lines, you can see that each side of the square has been separately outlined, with messy overlap in the corners. Even more interesting, the filled squares with wide lines have three outlines: one for each side of the wide line, and one for the filled interior.

This is unlikely to be what you want, so you’ll probably want to make sure everything you draw as a vector is drawn with the “hairline” width. Notice that if you draw a line with a small width (say, 1 point), you’ll end up with something on the vector tab that looks like a plain line, but is actually a very skinny box. Even if the width is negligible, the laser will trace the line twice. This slows down your job, and may make those lines visibly wider or darker colored.

RE3D has made no attempt to turn the bitmap image data into vectors, but it does capture the edges of it as a black vector rectangle, even though there was no line drawn around the image in CorelDraw.

RE3D gives you separate power and speed controls for each color, including black, but as you can see it creates extra black vectors whenever it sees drawing features that have width. For this reason, you will probably need to avoid drawing in black whenever your drawing isn’t entirely made of “hairline” vectors. If you do, you’ll know that anything that appears in black on the vector tab is a mistake.

Raster Rendering

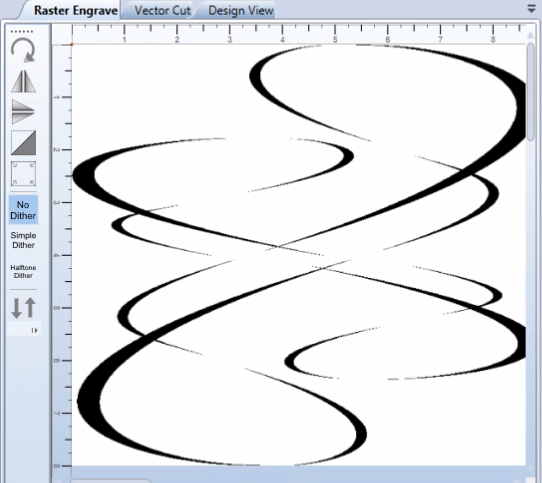
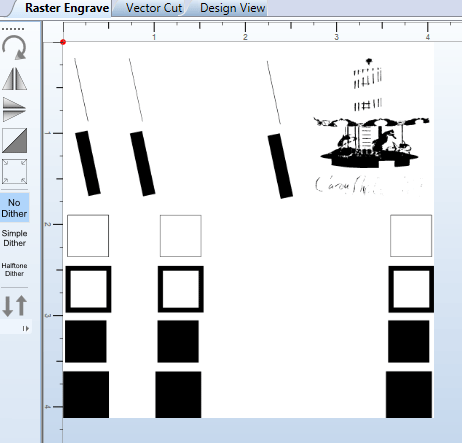
Here’s what it looks like on the Raster Engrave tab:

raster-235

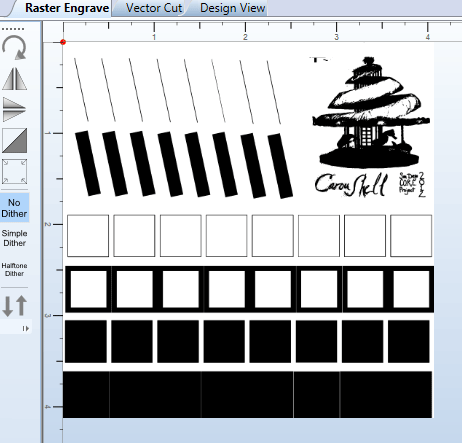
On the raster tab, everything is black, and RE3D has tried hard to capture everything you drew as some kind of raster image. Even the “hairline” lines and squares have resulted in raster data being generated. If you intended these features to be vector only, that’s a problem.

There’s no rectangle around the bitmap image here, but every area in the image that wasn’t very close to white is now shown as black. In this case, it’s a pretty good rendering of the image, so that might be perfectly fine. If your original image had more dark colors in it, this result might be pretty ugly.

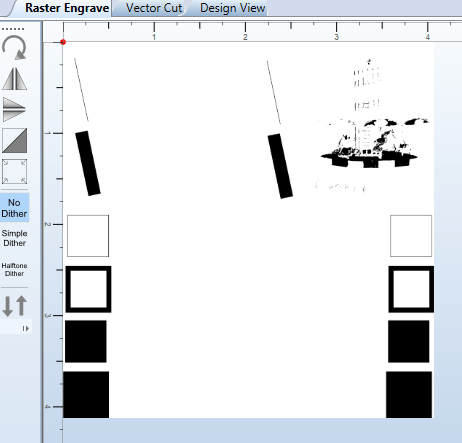
The solution in both cases is to adjust the B/W Threshold slider. In the image above, the threshold is set to 235, which is pretty close to the top of the range (255). If we lower the threshold, more and more of the lighter colored features will disappear from the raster preview. Here’s threshold 216:

raster-216

Now the yellow features, and the lightest parts of the image, have dropped out.

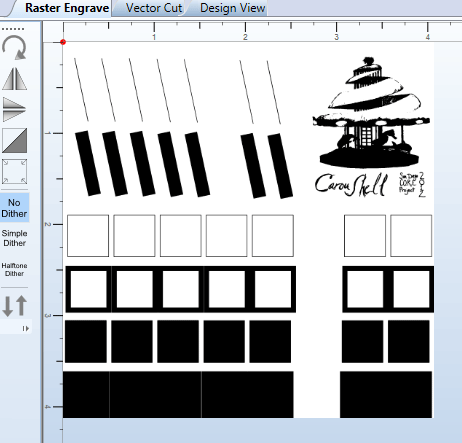
Here’s threshold 130:

raster-130

Now the cyan features have also dropped out, and the image data is starting to get pretty skeletal.

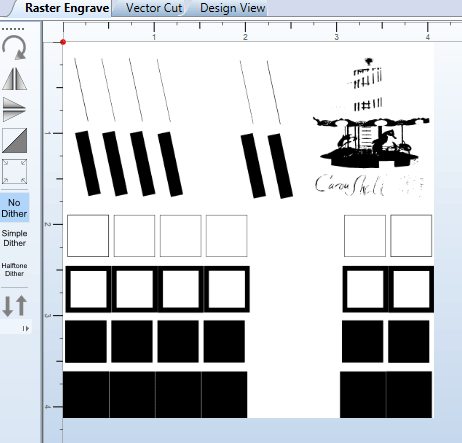
Here’s threshold 105:

raster-105

Now we’ve eliminated the red, green, and magenta features. The image is lighter still, but now it’s starting to show some interesting details in the lower platform area.

Here’s threshold 72:

raster-72

All the non-black features are gone, and there isn’t much left of the bitmap either.

Here’s threshold 7:

raster-7

Now everything that isn’t really black is gone. Apparently the bitmap image didn’t contain any truly black pixels.

So, the B/W Threshold slider lets you get rid of the raster data that was generated from vector input, and it also lets you adjust the rendering of the bitmap image into black and white. If you can find a setting that does both with great results, then that’s all you need to do.

When the B/W Threshold Setting Is Not Enough

But what if the threshold setting you need to make the bitmap image look its best doesn’t eliminate all the vector features?

In some cases, you can just change the colors used for vector features to lighter colors. If you can make all your vectors yellow, then cyan, and so on, then you might not need to work any harder. But what if you need lots of different colors, in order to use different power and speed settings for different features of your drawing? In that case you might well run out of light-enough colors.

For that case, RE3D provides a checkbox in the Import Options section, called “Ignore Thin Vectors”. If this box is checked when you “print” your job to RE3D, the “hairline” vectors won’t appear on the raster tab at all. (There is also a “Tolerance” setting which is supposed to control how wide a line can be and still be ignored, but it doesn’t appear to do anything.)

What’s more, if you check the “Ignore Thin Vectors” box, the lines with non-hairline width won’t appear on the vector tab either! That means those features won’t appear anywhere in your job, which can be confusing. If you accidentally have smaller features drawn with non-hairline width, it would be very easy not to notice the missing features until it’s too late. So, use the “Ignore Thin Vectors” option with caution.

There’s also an “Ignore All Vector” checkbox, but it doesn’t do anything useful for us. It still doesn’t ignore the wide (non-“hairline”) vectors, and it wipes all your vectors off of the vector tab. The only reason this might be useful is if your file contains so many detailed vectors that it takes a long time to import, and you don’t want them.

You may run across cases where there is no combination of RE3D settings that works the way you want. For example, if you have multiple bitmap images, and they don’t all look good at the same B/W Threshold setting. For that case, the simplest solution is probably to pre-render the bitmap images in your drawing program before “printing” the job to RE3D. CorelDraw has many features under the Bitmaps menu for this kind of work.

Sometimes it might be easier to run the vector and raster parts of your job separately. See the Combining Raster and Vector post, near the bottom, for tips on how to do that.


Where Did My Raster Detail Go?

Suppose I had a nice crisp bitmap file that I wanted to raster engrave. Say, this one:

original

But when I print it to RetinaEngrave3D, the fine details are gone and the lines are too skinny! What the heck happened?

The original swirls look nice and black and smooth to the eye, but at the pixel level that’s not exactly the case. Gray pixels have been used to make the curves appear smoother. This is called anti-aliasing.

The solution is to adjust the B/W Threshold slider in the Raster Properties box to treat more of those gray pixels as black, until the effect is what you want.

Also, if you raster engrave a design like this at low power and high speed, you’ll find that the vertical and near-vertical lines are stronger than the horizontal and near-horizontal lines. This is because the laser unavoidably puts out an extra burst of power whenever it turns on, which it does at the left and right edges of any vertical feature as it rasters back and forth horizontally. This extra burst emphasizes the edges of vertical features. To minimize the visual impact of this effect, increase the power or decrease the speed, at least enough so that horizontal features are strongly engraved. The vertical features will be engraved a bit deeper, but that will be much less noticeable.

Combining Raster and Vector

It’s often useful to have both raster and vector data in the same job. For instance, if you want to create an engraved medallion with your logo on it, you’ll probably want to raster engrave the logo (or parts of the logo) and also vector cut out the shape of the medallion (i.e., the outside circle). RetinaEngrave3D requires you to be a little careful with colors when you want to do something like this.

Whenever you print an image from, say, CorelDraw to RetinaEngrave3D, all the features in your drawing will try to show up on both the raster screen and the vector screen (unless you’ve told RE3D to ignore raster data). Your task is to arrange for only the features you want rastered to show up on the raster screen, and only the features you want vectored to be vectored. The two screens behave differently.

The Raster Tab

On the raster screen, everything you see in the on-screen preview will be rastered. There’s only one control that can change what you see: the slider marked “B/W Threshold” in the “Raster Properties” box on the right side of the RE3D screen. When you’re working with a grayscale photograph, this slider is used to set the level of gray that will be treated as black. Everything lighter gray will be white, and everything darker gray will be black. If you set it to 255, the whole screen will be black; if you set it to 0, the whole screen will be white. If you set it somewhere in the middle, light colored features will be hidden and darker features will be visible. The secret here is that colors are treated as shades of gray, too. Yellow will be treated as a light gray, while darker colors like blue will be treated as darker shades of gray. Black, though, is always the darkest color. So what you need to do is make sure your raster data is true black, and your vector data is some other primary color(s). Then in RE3D, on the raster screen, simply adjust the B/W Threshold slider until all the vector data disappears, leaving just the raster data visible.

The Vector Tab

On the vector screen, you don’t get an actual preview. Instead, the color of each feature in your design is important. Each primary color you have used in your design is automatically assigned a line in the “Vector Layers” table. That includes black, which is what you used for your raster data. If you designed your raster data in a vector program like CorelDraw, chances are good that some parts of it will show up on the vector screen as well. Most likely, you’ll see an outline of your raster features, which you probably do not want. Since you drew them in black, they will all be controlled by the settings you put on black’s row of the Vector Layers table. If you set the “Passes” column for that row to 0, all black vectors will be ignored. They will still be visible on the screen, but they won’t be used when the job is run on the laser. Perfect!

Of course, for this to work, you have to make sure all the features you do want on the vector screen are a color other than black. Stick with the primary colors (red, green, blue, cyan, magenta, yellow) since that’s what RE3D is looking for. (Also, remember that you probably want these features drawn with zero stroke width, which CorelDraw calls “hairline”.) Again, each color automatically gets a row in the Vector Layers table. Set the order (if it matters), speed, power, and passes (usually 1) for each of these colors, according to what effect you want.

Raster then Vector

Once you have all this stuff set correctly, you can use the “Raster then Vector” mode (selected by a pull-down near the top of the window) to run both parts of your job. Note that switching to the Vector Cut tab in the main window resets this pull-down to Vector Mode, and likewise switching to the Raster Engrave tab resets it to Raster Mode. So finish your checking of both screens before selecting Raster then Vector mode. If you forget, you’ll get raster or vector but not both. As long as the material doesn’t move, you can recover by simply running the other mode manually.

Separate Raster and Vector Jobs

Sometimes it just isn’t convenient to use colors this way. For example, if your raster data isn’t pure black and white but also contains some grays or colors, you’ll want to adjust the B/W Threshold slider to get the best-looking treatment of those non-black colors. That may not be the same threshold setting you’d need to hide all the vector data. You could always go into a bitmap editing program like Photoshop (or Corel Photo-Paint, which we do have installed) and alter the raster data to be pure black and white, but that’s an extra hassle. Instead, you might find it easier to just handle the raster and vector parts of your job separately. You can put them into separate files, or from a single file you can temporarily delete the parts you don’t want, then print to RE3D, and then undelete them. Or, at least in CorelDraw, you can select the parts you do want, and in the Print dialog check the choice marked “Selection” in the “Print Range” box to print just those parts.

There’s a catch, though. If you print the raster and vector separately, they might not be lined up the way you want. Recall that when you print anything, RE3D finds the smallest rectangle that encloses everything you printed (the “bounding box”), and shoves that rectangle up into the upper left corner. If you print raster and vector data separately, each will have its own bounding box. If you’re not careful, they won’t be the same, and your raster and vector data won’t line up properly. There’s a standard trick to solve this problem: before you separate the raster and vector data, draw a yellow rectangle around the outside of your design (and don’t use yellow for anything else). Then include the yellow rectangle with both the raster data and the vector data. Yellow is a very light color, so your B/W Threshold setting will probably let it disappear. In the Vector Layers table, you can set Passes to 0 for yellow to eliminate it from the vector job. But in both cases, the yellow rectangle will be included in the bounding box, so everything will be lined up just the way you want.

(See also this Raster and Vector Rendering post, for a more visual explanation.)

Crud on Autofocus Probe

If the autofocus probe is covered with black tarry goo (see photo) at the end of your job, you’re cutting something that makes too much smoke and soot. If you can’t adjust your settings to avoid this kind of smoke and soot, please avoid using that material again. That same crud will land on the optics and cause another expensive repair.

Contaminated autofocus probe.

Contaminated autofocus probe.

Maximum Material Width < 48"

I thought I could fit a 48-inch wide piece of material onto the laser’s knife table (removing the honeycomb table that usually sits on top of it). After all, it’s supposed to be a 48×36-inch laser, right?

Actually, no. If you lower the Z axis a bit, the 48″ material can be fit in between the walls of the chamber. But when you raise the Z axis to focus on the material, it hangs up on the lip surrounding the table. This makes a horrifying noise, and very likely screws up the leveling alignment of the table, and could damage the Z axis mechanism.

Try to avoid doing that!

The laser is more accurately described as a 1200x900mm machine. That works out to 47.24″ x 35.43″. And in reality, the X/Y positioning system can’t even quite cover that entire area. It can really do 47.24″ wide, but the Y positioner only spans 35.19″.

And if you have the honeycomb mesh on the table, which you usually will, your material has to stay inside the frame that holds the honeycomb. Those dimensions are 45.875″x34″.

All numbers above are approximate. Leave plenty of margin if you can.

Vector Lines Cutting Twice

I caught the laser tracing over each vector twice. That takes twice as long, and adds extra charring and/or lost material.

You can see the double cutting without actually running the laser by changing the mode to Simulate Vector and then hitting Go. Watch the red dot and see if it’s doing the wrong thing, as it was for me.

What’s going on here? The problem, in my case anyway, was easily fixed once I figured it out. The object was set to have an Outline property of 0.5 points. That’s a skinny line, but it has a width. When CorelDraw prints a line like that to the laser, it encodes it twice, once for each edge of the line. This is very nearly invisible and undetectable on the Vector tab of Retina Engrave 3D, unless you run the simulation. The solution is to set the Outline property to Hairline. That makes each line have zero width, and so it only gets one pass of the laser. That’s probably what you want.

Getting Raster Data out of Vector Drawings

Today I struggled to get raster data out of CorelDraw and into the laser software, Retina Engrave 3D. It’s supposed to work, but I was consistently getting a blank screen on the Raster Engrave tab.

I hope there’s a better way, but here’s what worked for me: I exported the drawing to PDF, opened the PDF file with Adobe Reader, and printed to the Full Spectrum Engineering Driver from Adobe Reader.

In my case, the data I wanted to raster was actually text in a strange font. For the PDF trick to work for text, I had to install the font on the Colaser computer. I might have been able to work around that by converting the text to curves in CorelDraw, but once I found a combination that worked I was anxious to actually make some parts.

I also figured out that if you hit the J key to run a box on the laser, the software will forget that you had it set to Raster then Vector mode. If you set Raster then Vector mode and immediately hit G (or the play button on screen) then it really does raster then vector, as advertised.

Kerf size for finger joints

Finger joints, such as the ones used by the web-based box designer at http://boxmaker.rahulbotics.com, depend on accurate dimensions to provide a tight fit. If you take the standard settings, it assumes that the parts are cut out with no loss of material. Since there is always some loss, that creates a box that fits together, but loosely.

To get a tight fit, you need to click on Advanced Options and enter the real kerf width where it says Cut Width.

I ran some tests with quarter-inch acrylic (pretty typical for boxes) and found that a Cut Width of 0.005″ is about right for our laser today. That’s right in the middle of what the web page says are typical values. You can probably get away with just using 0.005 for your project. Of course, if you need the best fit, you’ll have to run your own tests on your material on the day you’re cutting it.

You’ll also want to use an accurate setting for Material Thickness. It turns out that quarter-inch acrylic is nominally 0.22″, and half-inch is 0.472″, and both of those numbers vary a bit. For perfect results, use a micrometer on your material.

Laser cut box made out of quarter-inch acrylic using a design generated by http://boxmaker.rahulbotics.com

Laser cut box made out of quarter-inch acrylic using a design generated by http://boxmaker.rahulbotics.com